
A couple of weeks ago, I did a test shoot with some friends of mine. The approach for the shoot, despite being in a very familiar environment (my apartment), was different. The portion I had spent most of time my pre-visualizing was the portrait of Kim, the female subject. The aim was a beauty portrait. I do not normally do beauty. Bluntly speaking, for me, photographing female subjects is very difficult, much harder than photographing male subjects. Although some of the challenge can be attributed to a number of items, I think much of it is due to the society and the well defined parameters it has set for what should and should not be seen as "beautiful." It sounds cold, I know. I do believe in the mantra of everyone being beautiful in their own way. But at the same time, no one can fully deny that mainstream media has not shaped our perception of what is attractive to the human eye. Clothes, hair styles, make up, the human body. It's all included in the list. But what is even more interesting is how this affects self-perception. As a result, people, women especially, spend more time criticizing themselves than complimenting. From a photographer's standpoint, these societal pressures create a bit of a challenge.
Onward...
The second big difference coming into this test shoot was my mental approach. A few months ago, I dove headfirst into the realm of film photography and put myself on digital hiatus, during which I learned two main lessons. The first was being more critical of what was in my frame. I started a "Project 120" on my Facebook page not only to share the images I had captured, but to force myself to post images I had not framed perfectly. The goal was to learn how to frame the hard way, which meant learning through failure and posting those imperfections, not as punishment, but rather as a method of reinforcement. In practice, it simply forced me to be more aware as I shot.
The second lesson I learned was to shoot at a slower pace, which compliments the first. Having to physically wind the film after a shot forces one to recompose and refocus, assuming the camera is hand held and not on a tripod. I lugged along my film camera on my rock climbing trips and asked a few of my buddies to let me take their portraits. They were gracious enough and let me harass them for 3 minutes in front of their peers (thanks guys!). One frame in 3 minutes. Not exactly snapping away. Each portrait had a slower pace than with my DSLR and in a way, it helped the portrait come together because the subject assumed the process would take longer than with digital, thus allowing more time for me to compose and, more importantly, for the subject to relax and simply be themselves.
Fast forward to two weeks ago. I wanted to do a studio-type portrait session again with my digital set up along with my strobes. I wanted to see what impact going on digital LOA had done for me.
Here's the set up I had pre-conceptualized:

Diagram of the set up
The set up was meant for the female subject. The overall feel I wanted was a comfort, "at home" type of beauty portrait. I asked Kim to bring clothes she felt comfortable in and were somewhat revealing but still PG-13. As for the lights, I used a large octabank on my main light and a beauty dish on the back light. The purpose of the backlight was to simulate sunshine coming through the window, which is what my subject's back was against (not shown above). Why not use real sunlight? Well, it was winter time in Seattle. That should be enough to tell you why I could not rely on the sun to make an appearance. But despite (or in spite of) my cruel assumptions, the sun DID show up and it came full force. There wan't a single cloud in the sky. Here's an ambient light shot at f/11, ISO 100 at max sync speed WITH a 2 stop ND filter:

Snapshot of the ambient light at (an effective) f/22, ISO 100.
I originally planned to shoot at a wider aperture, but quickly realized that wasn't going to happen. The space in my apartment is less than ideal as a portrait studio, but I can make things happen if lights and props are positioned strategically around, almost like cramming one last object into a full closet and then quickly closing the door before it all comes tumbling down. I had set up the lights and rearranged my apartment furnishings to make the shot work at a specific shooting angle. But with the unexpected appearance of the sun, the shot now involved really intense flare that I could not frame out without compromising my composition.
I decided to turn the negative into a positive and utilized the sun as a third light. I metered my lights in such a way that the sun was now a second kicker. The new orientation for my subject still involved the window but instead of her laying comfortably on the couch, I had her sit up on the window sill. I used a piece of white tulle I had leftover from another shoot to help diffuse the harsh sunlight that was blasting through the window (seen above). It also helped blur out the unsightly building behind her.
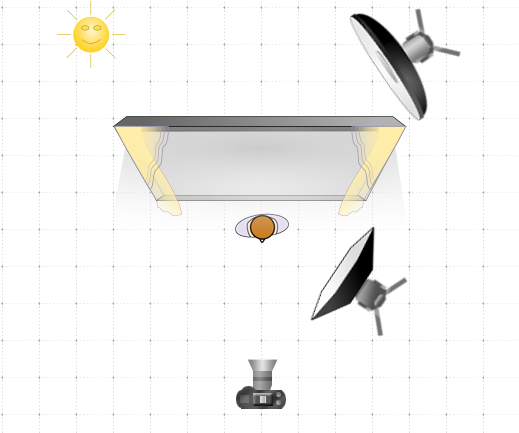
Diagram of final set up
Shooting film changed the way I shot this session. Simply comparing how many frames I took in this session (about 50 including test shots) compared to what I did a year ago (over 200) was pretty revealing. I felt more at ease and spent more time communicating with my subject instead of on the back of my camera. Always a plus. Below is the final shot. It's not going to win awards, but I believe it is a step in the right direction and I think I am finally starting to find my "style" (more on this in a future post). Keep scrolling for more shots.

...and a fun behind-the-scenes shot!
Keep Shooting


